Image Viewer
Users of the The Henry III Fine Rolls Project website have access to very high quality images of the original rolls. Because of the size of these images, they are displayed using a special image viewer which ensures that they can be quickly downloaded. The image viewer offers a number of tools which allow you to zoom in to a very high level of detail, and navigate around the image. Please note that in order to use the Image Viewer your browser must have support for the Macromedia Flash player, version 6 or later. If you do not have the plugin installed, you will find instructions on how to obtain it from the Macromedia website.
The following image illustrates what you might typically see when using the viewer. Please note that the appearance will vary very slightly depending on the type of computer (for example, Mac or PC) and the web browser you are using.
-
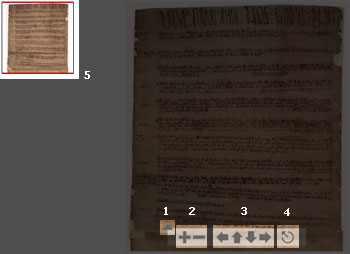
- Image browse
- The grey triangle can be clicked (PC users: using the left mouse button) and dragged to the right to increase the level of zoom. Moving to the right will zoom in to the image; moving to the left will zoom out.
- The plus and minus buttons offer a second way of controlling the level of zoom, but are easier to use for finer adjustments. Clicking the plus sign will zoom in to the image, clicking the minus sign zooms out.
- The arrows can be used to pan the image around. This is important when you have increased the zoom level since much of the image will run off the screen.
- Clicking this symbol will reset the image to the default level of zoom, i.e. completely zoomed out.
- This smaller representation of the fine rolls image remains in the top left hand corner of the screen. When you have zoomed in, the portion of the overall image you are viewing is indicated on this part of the screen by a red box.
The next image shows what the Image Viewer looks like once the zoom level has been increased:
-
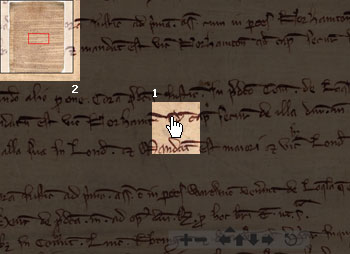
- Image viewer
- The pointer appears when you move your mouse over the image. By clicking (PC users: using the left mouse button) and dragging the mouse, the image can be panned around freely to reveal parts of the image which are off the screen.
- The red box here represents the portion of the complete image visible. The box can be dragged around by clicking and dragging with the mouse to pan the main image.